
Technically, a Cinemagraph is just a GIF or a Graphics Interchange Format, which is a bitmap image format that supports animation. Cinemagraphs, however, are more sophisticated.
The term "cinemagraph" was coined by U.S. photographers Kevin Burg and Jamie Beck, who used the technique to animate their fashion and news photographs beginning in early 2011. However, in December 2014, the United States Trademark and Patents Office awarded the trademark for the term "cinemagraph" to Flixel Photos Inc., a Canadian software manufacturer.
Getting the Shot
Now that we’ve defined what a Cinemagraph is; let’s get into the nuts and bolts construction of the thing. So you have an idea and you already know that you want a cinemagraph of a model with blinking eyes; now we have to bring it to life! The following is a step by step on how to do that.
Tools needed:
- Camera that shoots video
- Tripod or Stand
- Scene with model and or props
- Computer with photo and video editing software
First, you have to set up your scene properly. Choose your location and subject(s) and or props. Keep in mind what you want to move and what you want to remain still.
For our example, choose a solid background and have the model sit a few feet in front to create some separation, add lighting if necessary. Now frame the upper half of the face and head so it looks like the model is popping up from below the camera lens.
Set your camera to record at your preferred settings, for this example shoot 720p or 1080p at 24fps. Choose a format that is supported by your photo/video software program. Photoshop supports .AVI and .MOV formats. If your camera only records in .MXF or a proprietary format, you will likely have to convert your footage before importing it to your editing software. You will only have to record 10-20 seconds of footage.
Direct your model to stare at the camera and blink according to your idea. If done correctly, the background should not change and the model should not move anything except the blinking eyes. Playback may seem like you’ve achieved your goal; but when making a cinemagraph you’re really just getting started.
Post-production
Now connect to your computer and save files to a local folder and then import your footage by opening your software program, Photoshop for us, and go to: File>Import>Video Frames to Layers. A pop up window gives me the option to import the entire file into frames or just a selected portion of the file. Try to keep the total number of frames in your project to a minimum. If you’re doing a 5 second clip, about 100 frames will be good. Naturally, the more frames, the more smoothly the animation will playback. For artistic purposes, less can actually be more. Having a slight twitch is a stylizing choice that many artists use to recreate old film projector style clips, etc. To begin working with the clip, choose “import selected portion” and click on “Make Frame Animation” option and hit OK. Now you have a project with layers!
Go to window>timeline on the menu bar and you will be able to view your layers as frames in a timeline. These frames are linked to the layers panel, so keep this in mind while editing! Now choose the frames by sliding up and down the timeline to find your “action” sequence.
For my example I deleted all but 12 frames out of the 155 I started with. Because it’s going to loop you don’t actually need 100 frames as mentioned before. Photoshop numbers the layers and places the last frame on top. Once you choose your frames, delete the rest from your timeline and layers panel respectively; it may cause playback issues if you don’t. From your selected frames, choose last one (see figure 1), duplicate it and name it as your alpha layer, not alpha channel, duplicate it and set it at the top of all the layers in the panel. This is the layer that will control the other layers and remain still throughout the animation.
On the alpha layer, create a mask around the blinking eyes, as this is the only part of your project that will be moving, you are isolating the rest of the image by masking (figure 2). If your model didn’t sway and you locked off your camera correctly, your remaining frames should match your alpha layer perfectly. Set the playback to loop forever and hit play on the timeline and review your work. Here is where you will fine tune your animation by deleting frames, etc. You can subsequently resize, add effects, color correction and other custom art to your Cinemagraph.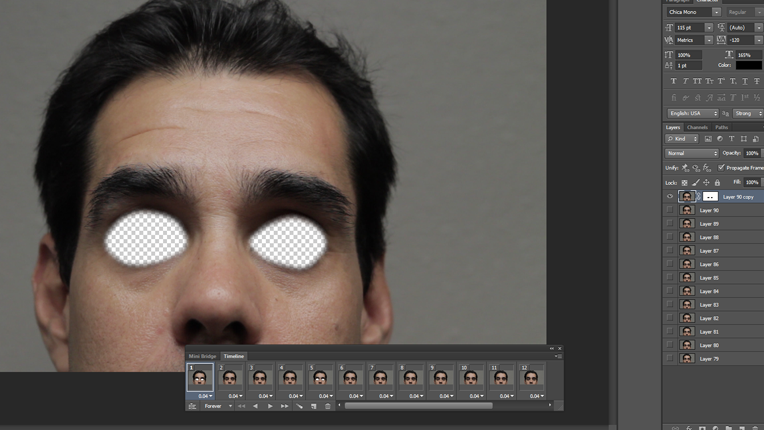
Finally, go to File>save for web and devices and choose the .GIF format. A pop up window will allow you to choose further settings and playback your animation. You should also save as a .PSD file so you can come back and edit the original composition for future use.

And just like that; you now have a Cinemagraph to share in memes and websites, forever!


