In a nutshell
- You need to use shot assist tools because you can’t rely on your camera’s monitor to give you an accurate display of the video you are capturing.
- Using zebras, false color, waveform monitors and histograms will ensure your exposure is correct.
- Focus magnify and focus peaking will keep your video sharp and in focus.
- Take the time to practice with your camera’s shot assist tools so using them becomes second nature and you know which to use and when.
As a camera operator, there are two things you should always get right: your footage should be correctly exposed, and it should be in focus. Thankfully, most modern video and cinema cameras have an arsenal of tools to help you get this right. Welcome to your camera’s shot assist tools.
No more nasty surprises
There are few worse feelings than getting back from a shoot only to find out there’s a problem with your footage. Don’t feel bad; we’ve all been there. Maybe your camera’s monitor had the brightness turned down low, so your video looked great on set. However, when you review it, it’s overexposed, with the highlights blown out. In addition, the small screens on cameras can make it hard to be sure your focus is perfect. Higher resolution video, such as 4K, emphasizes if your focus is even just a little off.
Tools such as zebras, false color, waveform and histograms help you get the right exposure. This feature teaches you which is best to use in which scenario. In addition, focus zoom and focus peaking ensure your subject is sharp and your focus is perfect every time.
Understanding exposure
In order to use the exposure tools properly, you need to understand the IRE scale. The Institute of Radio Engineers developed the system, and IRE values effectively measure the brightness of your video. A measurement of 0 is pure black, and a measurement of 100 is pure white. No matter what you do in post-production, you can’t recover detail from those parts of the image. The image has been “clipped.” The values from 1 to 99 represent varying shades of gray, from near pure black to nearly pure white.
IRE is a highly accurate way to measure exposure, and the exposure assist tools on your camera will reference it. Let’s cover these one at a time.
Zebras

Zebra Pattern or Zebras is a highlight warning indicator. It overlays black and white stripes on the image on your monitor to indicate areas that exceed a particular IRE value. Most often, camera operators use zebras to indicate overexposed parts of the image where no detail will be recorded. However, many cameras allow you to adjust the IRE value at which the zebras will display.
Setting zebra levels
If you set zebras to 100 IRE, they will show where your image is actually clipping. So long as you don’t see any zebras on your monitor, then you know you haven’t overexposed your video. However, it may be better to set the zebras to 90 IRE or 95 IRE. You can then identify the brightest areas with detail but close to clipping.
If your camera has a wide enough range for setting zebras, you can use them to correctly expose skin tones. For example, Caucasian skin should be exposed at around 60 to 70 IRE, while brown skin may show better at 48 to 52 IRE.
Using zebras
Zebras are a great tool to leave on while you are filming. The distinctive pattern will immediately alert you to adjust your exposure and avoid clipping your image if the lighting changes. In addition, you can use zebras to ensure that exposure is consistent from shot to shot.
False color
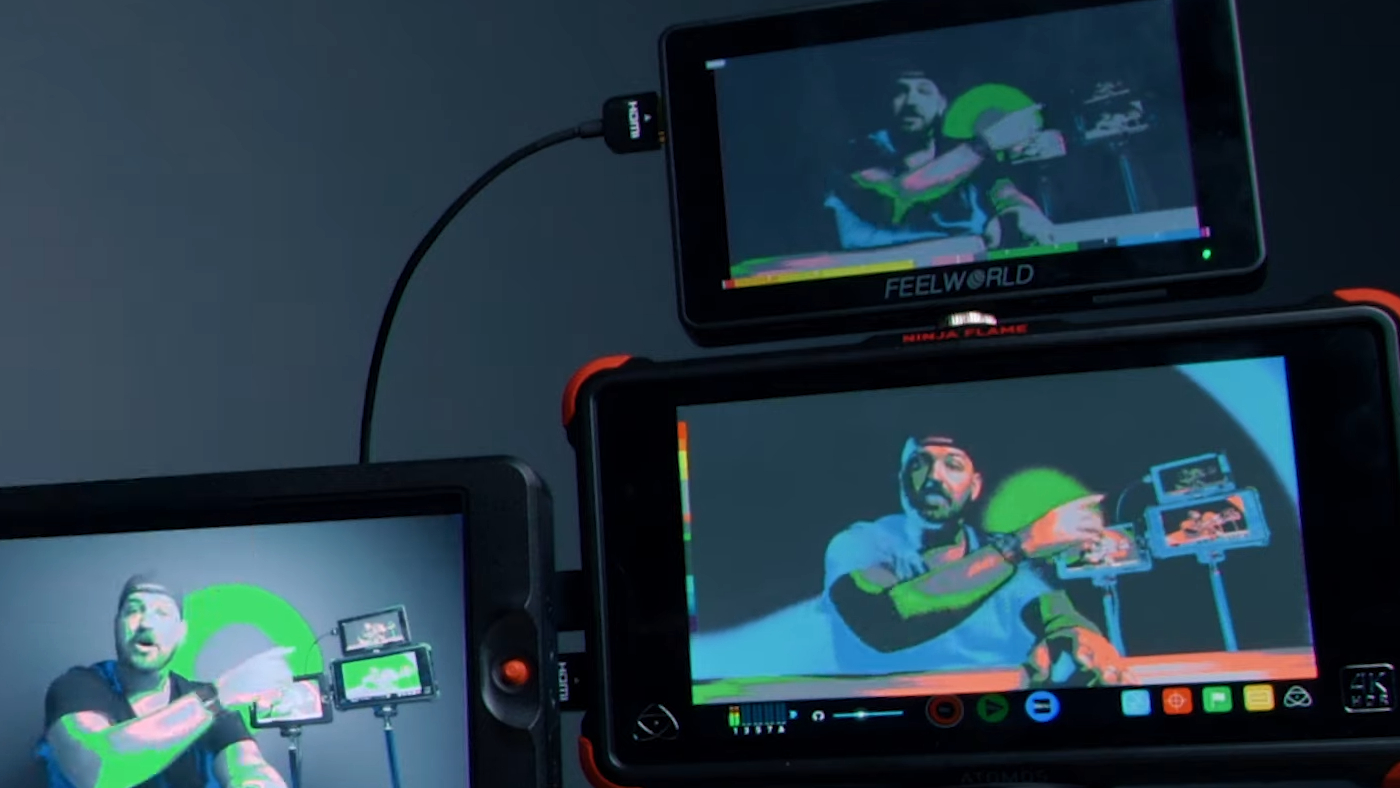
False color assigns specific colors to represent the IRE values in your shot. While zebras only show up on part of your monitor, false color changes the look of the whole screen. For example, with Blackmagic cameras, areas that are IRE 95 and over appear red, and those that are IRE 5 and under are purple. Middle gray (18 percent) appears green, and one stop over middle gray, for Caucasian skin tones, is pink.
Using false color
False color is great for quickly assessing the relative exposure levels across your frame. It is also ideal for determining the contrast ratio between the key and fill light on your subject’s face or between the subject and the background. You can’t easily use false color while filming, though, as the image looks so strange. It’s best used while setting up your shots.
Another point to note is that different camera manufacturers use different color schemes for false color. Therefore, make sure you are familiar with the key for the false colors used on your camera or external monitor.
Waveform monitors

A waveform monitor is a representation of your frame from left to right and shows you how dark or bright it is based on the IRE values. Any underexposed areas of your shot below or along the 0 line will be black, without any detail. If the highlights get to the 100 line, they will be overexposed and clipped. The middle portion of the waveform monitor represents the mid-tones, ranging from black to grey to white as the percentage increases.
Using waveform monitors
If you color grade your video in a program such as DaVinci Resolve, you will already be used to reading a waveform monitor. However, even if you are new to it, with a little practice, you’ll soon learn how to utilize this tool to understand the exposure across your image.
Histogram
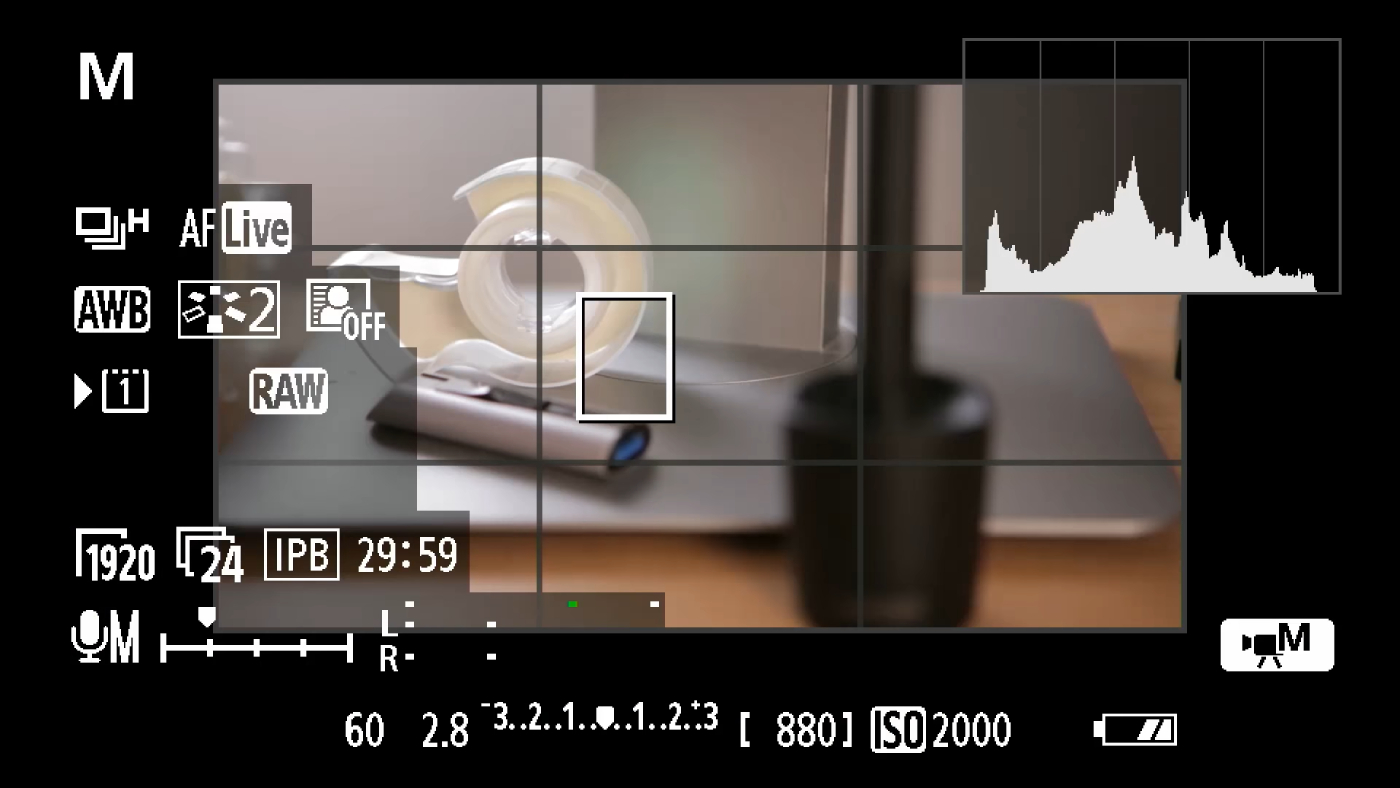
A histogram is similar to an XY graph you might have used at school. The X row across the bottom represents the range from 0 IRE on the left to 100 IRE on the right. The height (Y) of each part of the graph represents the amount of the image being exposed at that IRE level. If the left side height is dramatically larger than the right, you have a lot of dark areas in your shot. Conversely, you have more bright areas if the right side is higher.
Using the histogram
The histogram is another tool you can use while filming. As such, many cameras will display a small histogram in one corner of the monitor. Ideally, you want to avoid the far-left and/or far-right measurements going off the scale. This means you are losing that information, and your image is clipping. The optimal situation is to have a nice balanced graph without the edges touching each end of the histogram.
Focus assist tools
Now you can be confident that your video is correctly exposed, it’s time to make sure it’s in focus. Even if your camera does have autofocus, you can’t always rely on it to select the right part of the image to focus on. Again, it’s time to use your camera’s shot assist tools.
Focus magnify
With focus magnify, you press a button or tap the monitor screen to digitally zoom into the image. Essentially it “magnifies” an area of your frame. You then adjust the focus to be sharp before zooming back out to your original framed image. To be clear, you are not adjusting the lens or changing the focal length. The feature works like putting a magnifying glass over the image and then removing it after you focus.
Using focus magnify
It’s not practical to use focus magnify while filming unless your camera is locked off on a tripod. Even then, you might find that tapping the screen or pressing the button shakes the camera slightly. Therefore, focus magnify is a tool to use while setting up a planned shot.
Focus peaking
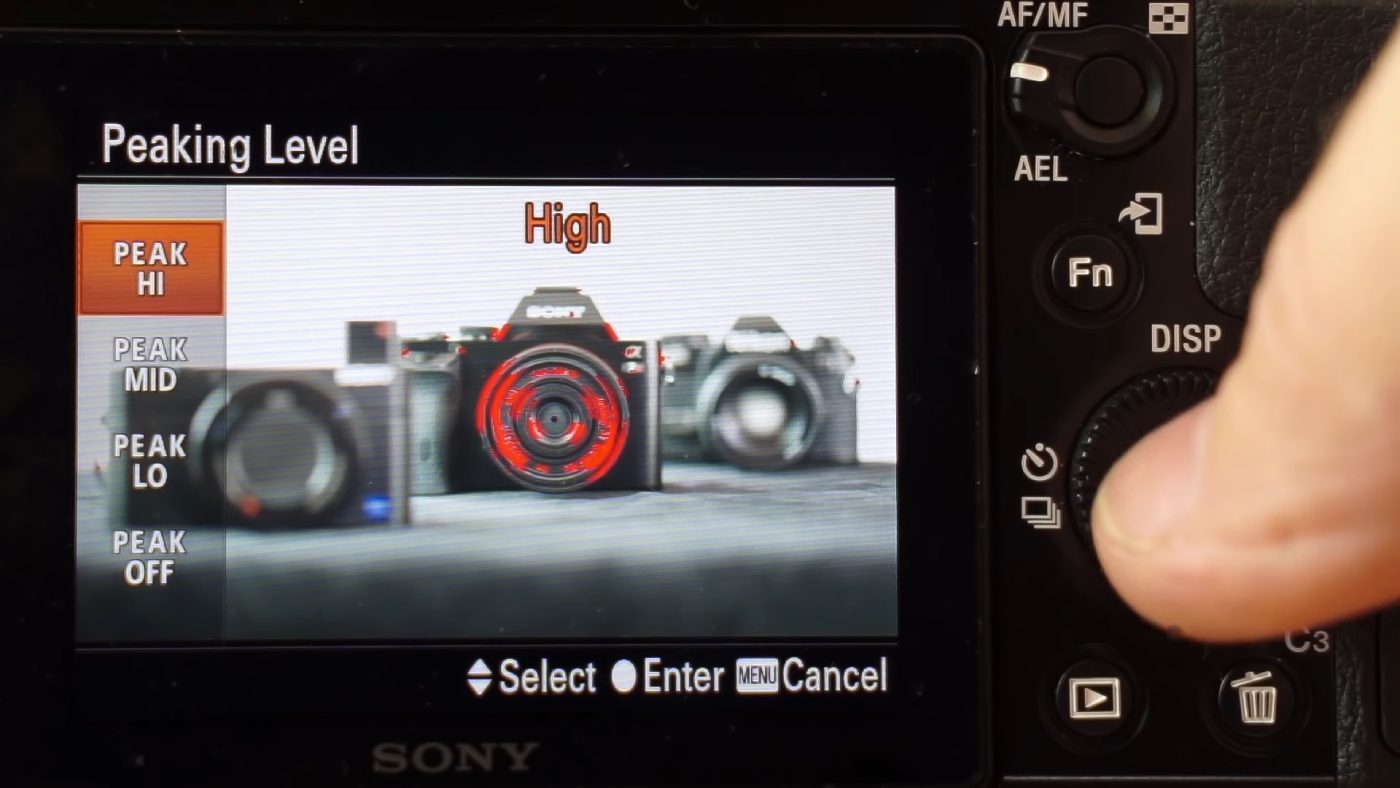
Focus peaking overlays colored lines or a colored pattern on the areas of your image that are in focus. Depending on the depth of field of your shot, the focus peaking may appear as a fringe around the edges of your subject or across whole areas of the image. Focus peaking uses a high-contrast color like red, green or blue.
Using focus peaking
Focus peaking is another great tool you can use while shooting. With peaking switched on, you can clearly see which parts of your frame are in focus and adjust quickly if needed. In addition, most cameras let you select the color for focus peaking, so you can choose one that stands out against your image.
One note of caution is that focus peaking looks for areas of high contrast in your image. Therefore, it can sometimes be confused by high-contrast elements in your frame and give a false indication. However, you will soon learn to spot these situations and use focus magnify to double-check your focus before you hit record.
Practice makes perfect
Your camera’s monitor won’t always give you an accurate display of the video you are capturing. However, you can use the shot assist tools built into your camera to give you confidence that your footage is correctly exposed and in focus. Take time to practice so that using these tools becomes second nature and you know which to use and when. That way, you can make sure you don’t get any unpleasant surprises in the editing room.
Contributing editors to this article include Pete Tomkies and JR Strickland.
Feature image courtesy: Asso Myron


